Canon EOS R10 Manual⁚ A Comprehensive Guide
This comprehensive guide covers the Canon EOS R10, from initial setup and package contents to advanced techniques and troubleshooting․ Learn about shooting modes, autofocus systems, image review, menu navigation, wireless connectivity, and more․ Downloadable manuals and software are also discussed․
Getting Started⁚ Quick Start Guide and Package Contents
The Canon EOS R10’s initial setup is straightforward․ Begin by charging the included battery․ Once charged, insert the battery and memory card (SD/SDHC/SDXC) into their respective compartments, ensuring correct orientation․ The card should click securely into place․ Attach the lens, aligning the red index marks on both the lens and camera body․ Turn the power switch to the “ON” position․ The package typically includes the camera body, battery, charger, strap, and instruction manual․ A lens may be included depending on the purchased kit․ Note that a software CD-ROM is not included; software must be downloaded from the Canon website․ Refer to the included Quick Start Guide for a simplified overview․ For detailed instructions, consult this Advanced User Guide or the online Canon resources․ Remember to carefully check all included items against the packaging list to ensure nothing is missing․ Should you purchase a lens kit, verify that the specific lenses and any accompanying accessories are present․
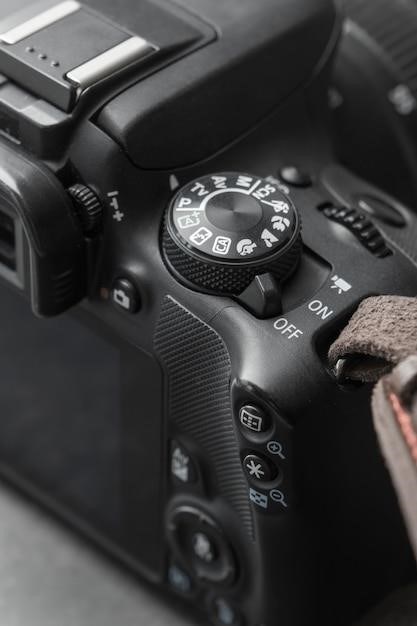
Understanding the Camera⁚ Part Names and Basic Functions
Familiarize yourself with the Canon EOS R10’s layout․ Key components include the mode dial, shutter button, main dial, quick control dial, multi-controller, AF start button, menu button, and power switch․ Locate the viewfinder, screen, and flash․ Understand the function of each dial and button․ The main dial adjusts various settings depending on the selected mode, while the quick control dial provides quick access to frequently used functions․ The multi-controller allows for precise navigation through menus and focus point selection․ The AF start button initiates autofocus, crucial for sharp images․ The menu button accesses the camera’s extensive menu system for detailed settings adjustments․ The power switch controls the camera’s on/off function․ Mastering these basic controls is essential for efficient operation․ Refer to the camera’s diagram for precise identification of each part․ Pay close attention to the placement of the battery and memory card compartments, as well as the lens mount․ Understanding the basic functions of each component will significantly improve your photography experience with the Canon EOS R10․ The diagrams and illustrations in the manual will help you grasp the camera’s physical layout and functionality․
Shooting Modes and Settings⁚ Manual Exposure, Auto Modes, and Custom Settings
The Canon EOS R10 offers a variety of shooting modes to suit different photographic needs and skill levels․ Begin with the automatic modes like Auto, Scene Intelligent Auto, and various scene modes for straightforward shooting․ These modes automatically adjust settings based on the detected scene, simplifying the process for beginners․ For greater control, explore the semi-automatic modes like Aperture-priority (Av), Shutter-priority (Tv), and Bulb․ These modes allow you to control either aperture or shutter speed while the camera automatically adjusts the other exposure setting․ Mastering manual exposure (M) mode provides complete control over aperture, shutter speed, and ISO, allowing for creative expression and precise exposure adjustments․ Familiarize yourself with the camera’s extensive menu system to customize settings such as white balance, image quality (JPEG, RAW, or both), and picture style․ The EOS R10 also enables the creation of custom shooting modes, allowing you to save frequently used settings for quick access․ Experiment with different modes and settings to find your preferred shooting style and discover the creative potential of the Canon EOS R10․ Detailed explanations of each mode and setting are provided within the camera’s manual and online resources․
Focusing and Autofocus Systems⁚ AF Modes, Servo AF, and Focus Points
The Canon EOS R10 boasts a sophisticated autofocus system crucial for capturing sharp images․ Understanding its various modes is key to maximizing its capabilities․ The camera offers several AF modes, including One-Shot AF ideal for stationary subjects, where focus is locked once achieved․ Servo AF (AI Servo AF) is designed for moving subjects, continuously tracking and adjusting focus to maintain sharpness․ Consider using AI Focus, which automatically selects between One-Shot AF and Servo AF based on the scene․ Selecting the appropriate AF area mode is equally important․ Single-point AF allows for precise focus selection, while Zone AF and AF Area Selection let you choose a group of points or a wider area for focusing․ The EOS R10’s autofocus system utilizes a multitude of focus points across the sensor, ensuring subject acquisition even with off-center composition․ The density and distribution of these points vary based on the selected AF area mode, affecting the camera’s ability to acquire focus in different scenarios․ Mastering the interplay between AF modes, area selection, and subject movement is critical for achieving consistent focus accuracy and capturing crisp, well-focused images․ Experimentation and practice with diverse subjects under varying conditions will refine your autofocus technique․
Image Playback and Review⁚ Browsing Images, Deleting, and Protecting
After capturing images with your Canon EOS R10, reviewing and managing them is straightforward․ Playback mode allows you to browse through your photos and videos․ Use the Main dial and Multi-controller to navigate through the images, zooming in to check details and sharpness․ The display provides essential information such as shooting settings, date, and time․ Deleting unwanted images is easily done through the menu system; a confirmation prompt helps prevent accidental deletions․ For important images, protecting them from accidental deletion is essential․ The protection function marks selected images to prevent erasure, ensuring your precious shots remain safe․ Reviewing images on the camera’s LCD screen is convenient but consider connecting the camera to a computer or other devices for a larger, more detailed review․ This allows for more thorough assessment of image quality, exposure, and composition․ This detailed review process is beneficial for learning from your photographic experiences and refining your skills․ The R10’s playback features are designed for efficient image management, offering a smooth workflow from capture to review and organization․
Menus and Custom Functions⁚ Navigating the Menus and Personalizing Settings
The Canon EOS R10’s menu system provides access to a wide array of settings, allowing for extensive customization․ The menu structure is logically organized into tabs, making navigation intuitive․ Each tab groups related settings, such as shooting settings, image quality, and playback options․ The Quick Control Dial and Multi-controller facilitate efficient menu navigation, enabling quick adjustments․ Custom Functions allow you to personalize frequently used settings, assigning them to easily accessible buttons or dials․ This streamlines your workflow and reduces the time spent searching through menus․ Understanding the menu system is crucial for maximizing the camera’s capabilities․ By exploring the various settings, you can fine-tune the camera’s performance to suit your specific needs and shooting style․ Experimentation is key; test different settings to see how they impact image quality and overall usability․ The detailed descriptions in the manual aid in understanding the function of each setting․ Through this, you can optimize your shooting experience and create exactly the images you envision․
Connectivity and Wireless Features⁚ Connecting to Smartphones and Computers
The Canon EOS R10 offers versatile connectivity options for seamless image transfer and remote control․ Connect to smartphones and tablets via Wi-Fi using the Canon Camera Connect app․ This allows for easy image sharing to social media or cloud storage services․ Remote shooting capabilities let you control the camera’s settings and trigger the shutter from your smartphone, ideal for self-portraits or capturing wildlife from a distance․ For computer connectivity, use a USB cable to transfer images for editing and archiving․ The camera supports various USB standards, ensuring fast and reliable data transfer speeds․ The manual provides detailed instructions for pairing with smartphones, configuring Wi-Fi settings, and troubleshooting any connection problems․ Ensure your device’s operating system is compatible with the Canon Camera Connect app for optimal performance․ Explore the advanced features of the app, including remote live view, for enhanced creative control․ Efficiently manage your images by utilizing the camera’s wireless capabilities to streamline your workflow․ Regularly update the firmware of your camera and the Canon Camera Connect app to take advantage of the latest features and bug fixes․
Advanced Techniques⁚ HDR, Smooth Skin Mode, and Other Special Features
The Canon EOS R10 empowers you beyond basic photography with several advanced features․ HDR (High Dynamic Range) mode captures multiple exposures at different brightness levels, combining them into a single image with expanded dynamic range, revealing details in both highlights and shadows․ This is particularly useful in high-contrast scenes, such as landscapes with bright skies and dark foregrounds․ The Smooth Skin mode is a beauty setting that softens skin tones in portraits, reducing blemishes and imperfections for a more polished look․ This feature is adjustable to suit your preference and the subject’s skin tone․ Explore the creative filters offered by the camera, which provide artistic effects such as miniature, fish-eye, and toy camera effects, adding unique stylistic touches to your images․ The camera also supports various shooting modes, including multiple exposure, which allows you to layer multiple images together for artistic expression․ Mastering these advanced techniques will elevate your photography skills and unlock creative possibilities․ Consult the detailed explanations and examples within the manual to refine your understanding and application of these special features․ Experiment with different settings to find your preferred style and achieve outstanding results․
Troubleshooting and Maintenance⁚ Common Problems and Solutions
This section addresses common issues encountered with the Canon EOS R10 and provides solutions for quick resolution․ If the camera fails to power on, first check the battery level and ensure it’s correctly installed․ Clean the battery contacts if necessary․ If the image appears blurry, verify the focus mode is set correctly (Autofocus or Manual Focus), and check the lens is securely attached․ Confirm the lens is clean and free from obstructions․ Examine the image stabilization settings․ Addressing low-light image quality requires understanding ISO settings and adjusting accordingly; higher ISO values increase sensitivity but can introduce noise․ For problems with image playback, ensure the memory card is properly inserted and formatted correctly․ If the camera freezes, try removing and reinserting the battery․ For more complex problems, consult the detailed troubleshooting section of the manual or Canon’s online support resources․ Regularly clean the camera body with a soft, dry cloth․ Avoid using harsh chemicals or abrasive materials․ Lens cleaning should be performed with a lens cleaning pen and a blower brush․ Proper care will extend the lifespan of your Canon EOS R10 and ensure optimal performance․
Software and Downloads⁚ Canon’s Digital Photo Professional and Firmware Updates
Enhance your Canon EOS R10 experience with Canon’s Digital Photo Professional (DPP) software․ DPP provides powerful tools for RAW image processing, allowing for adjustments to white balance, exposure, contrast, and more․ Download DPP from the official Canon website, ensuring compatibility with your operating system․ Regularly check for updates to maximize features and performance․ The software offers advanced editing capabilities beyond basic adjustments, enabling finer control over image details and color correction․ Utilize DPP’s features to optimize your images and achieve professional-quality results․ Beyond DPP, Canon provides firmware updates for your EOS R10․ These updates often include bug fixes, performance improvements, and new features․ To check for and install firmware updates, visit the Canon support website and locate the downloads section specific to the EOS R10․ Follow the on-screen instructions carefully during the firmware update process․ Never interrupt the update process, as this may damage the camera․ Keeping your firmware up-to-date ensures optimal camera performance and access to the latest features․
Leave a Reply
You must be logged in to post a comment.